Assembly Instructions
Congratulations and Thank You for your
|
 Photo Details
 |
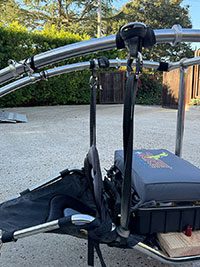
The 28" Hang Straps will be attached as shown in this photo.
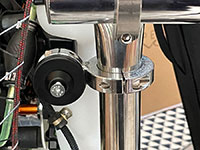
Use the included Aluminum Split Collars to "keep" the 28" strap just behind the Seat Straps on the side of the Rear Axle as shown using a Lark's Head Knot.
This is the setup that I use, just the single 28" Hang Strap to the carabiner, but you can also add the 22" Hang Straps for more security (I have NEVER had a Hang strap break or even show signs of wear).
The 22" Hang Straps can also be attached in the usual place shown in the Bullet instructions. Both Hang Straps will then attach to the Carabiner which should then be positioned just below the Riser Guides.
The Rear Seat is comprised of the wooden Base, the Toolkit and the Seat Cushion. These are simply set in place as they are held by the Seat Board. The Seat Cushion is tied to the Toolbox using the Cushion Ties.
Click the photo or this link for more Photo Details.
 Parallel Steering
Installation of this assembly is easy and straightforward.
Remove the rear bolt used to hold the Front Downtube just under the front of the seat.
Position the Parallel Bar on the Pivot Tube and secure with the bolt and washer.
Insert the Pivot Tube into the Downtube and seat it completely. Replace the bolt holding both the Pivot Tube and Front Downtube to the Side Frame sections.
Attach the connectors as shown in the Photo, making sure they are parallel. Position the clamps onto the Front Fork first as close as possible to the the wheel. Then adjust the length as necessary and attach them to the Parallel Steering Bar and tighten the clamps.
The front Seat Belt will attach the way described in the Bullet Assembly. You can see in the photo details an optional Kayak seat back to support the front occupant purchased from Amazon.
The Rear Seat Belt will attach to the Rear Upright with the added Split Collars to position the Belt.
 We will be attaching the Paramotor frame to the Rear Uprights or Horizontal Bar, depending on the brand you have.
Attach the Comfort Bar Adapters to your Paramotor Frame and set the Paramotor on some kind of box that puts the base of the Paramotor Frame equal to or slightly above the lowest point of the Rear Axle.
Remove one half of the Split Collar to allow you to position the motor correctly at the rear of the trike.
Move the Rear Uprights in or out as needed to match the frame of your Paramotor. Tighten the Comfort Bar Adapters securely to the rear of your TrikeBuggy.
The Comfort Bar Adapters will hold the weight of your Paramotor, and the velcro straps will hold the lower portion of your motor frame against the Rear Uprights.
You can see the motor height in this photo clearly.
It is slightly above the height of the Rear Axle.
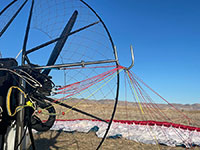
To attach the paraglider to the TrikeBuggy Bullet Tandem, bring the risers through the Riser Guides and attach them to the Carabiners already attached to the Hang Straps on the hips of the Buggy. Attach the A-Assist cords to the inner "A" risers and check for adjustment - no effect on the glider when risers are overhead in the flying position!
 Line keepers on the paramotor cage at the 3 and 9 o'clock positions are a good idea to keep the lines organized for launch. 6 inches of clear tubing can be split and taped or zip tied to the cage.
Or, better yet - you can get our Bullet Line Guides and make it even easier! Click the picture to the left for more information.
Check all bolts, nuts and clamps before each flight, just as you would do on your motor - Preflight!
If there are any questions or concerns, please feel free to call me anytime (Chad Bastian at 805-403-1859) on my cell phone, or email me at chad@TrikeBuggy.com. If I'm not flying at the moment, I will gladly assist you.