Classic v1.0Assembly Instructions
Congratulations and Thank You for your purchase of the TrikeBuggy!
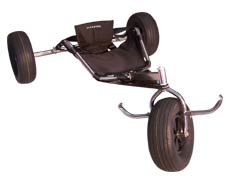
Assemble the Flexifoil Kitebuggy according to the instructions supplied. Pay careful attention to the seat strap detail and be sure to use the copper bolt lubricant supplied, or the bolts will seize! The included sand shield is helpful if launching from sandy beaches. Keep the tire pressure low if you are going to be launching from soft sand, or simply want a softer ride.
If you desire, you can make some clamp pads so you do not scratch the paint on your motor unit when attaching the frame clamps to the Power Loops. Cut 1 inch tubing into 1 inch pieces, then cut a slit in them so you can wrap them around the frame where the clamps will be attached. Do not use these on the Power Loops, as these are fitted perfectly to the frame clamps.
Once the motor is in position at the clamps, have someone hold the motor while you tighten the clamps to hold the motor securely. Do not
To attach the motor on the Basic TrikeBuggy, find a suitable base to hold the motor upright so that the lower frame skids are just below the axle of the buggy.
Now view the trike from the side. Gently loosen the lower part of the clamp attached to the axle and tilt the motor slightly forward.
Keeping the angle slightly forward, attach the upper Motor Clamp around the Power Loops and the motor frame on one side. Position the clamp as high on the straight part of the Power Loop as you can. Make certain that you are attaching the Power Loops to the frame of your paramotor, and not the cage!
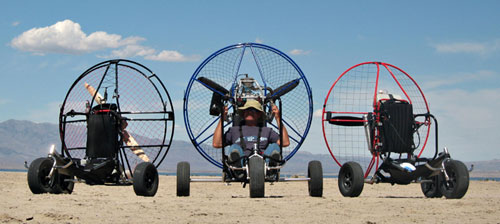
For Fresh Breeze motors, click HERE to see how the brackets are attached. For Blackhawk Rhino motors, click HERE for the basic and HERE for the Deluxe to see how the brackets are attached. For Fly Products Kompress motors with the foldable frame, click HERE for pictures of mounting the base (Deluxe only).
Make sure the Power Loops are directly above the buggy frame at its highest point. Tighten the Hip and Motor Clamps by gently rocking the Power Loops against the motor and buggy. By rocking the frame, you can easily tighten these to a snug pressure that will be sufficient. Make sure the Power Loops are lined up straight against the motor frame and the motor angle is still right before you tighten them. Adjust the knobs after tightening so it is facing away from the pilot (Motor Clamp knob position is adjustable without loosening).
Attach the Seat Belt by pushing the loop end of each side of the belt through the Power Loop, then under the buggy frame next to the clamp and strap already installed.
Attach the Seat Pad (optional) to each side strap of the back support of the buggy. Attach the upper straps of the back pad to a cross member of the motor so that the pad is positioned just above the buggy's seat. If your motor has a back pad already, leave the pad attached and attach the TrikeBuggy back pad in front of the other.
Additional padding may be placed in the buggy seat or behind the pilot to increase comfort if desired. Just be sure to secure it so that it cannot come loose and get into the propeller!
To balance the trike for flying, hang the trike 6-8 inches above the ground from a secure source (tree, beam, flight simulator) by the caribiners and sit in the seat. Have someone look at the balance from the side of the trike. The front wheel should be 6-12 inches higher than the rear wheels when suspended with the pilot in the seat and gas in the tank.
Check all bolts, nuts and clamps before each flight, just as you would do on your motor - Preflight!
If there are any questions or concerns, please feel free to call me anytime (Chad Bastian at 805-403-1859) on my cell phone, or email me at chad@TrikeBuggy.com. If I'm not flying at the moment, I will gladly assist you.
Enjoy your new TrikeBuggy!
|
|
|---|
|
DISCLAIMER: Please read and be sure you thoroughly understand this disclaimer before flying a TrikeBuggy. Trike flying is an extremely demanding sport requiring exceptional levels of attention, judgment, maturity and self discipline. It is unlikely that you will be able to participate in it safely unless you make a conscious and continual commitment to your own safety. PPG and Hang Glider Trike flying is a dangerous sport and may result in injury and death even when practiced by a competent pilot using proper equipment. TrikeBuggies are not covered by product liability insurance, nor have they been designed, manufactured or tested to any federal or state government airworthiness standards or regulations. Do not fly them unless you are willing to assume personally all risks in the sport of Trike flying, and all responsibility for any property damage, injury, or death which may result from your use of this TrikeBuggy. Safe operation of the TrikeBuggy requires a pilot proficiency equivalent to that of a BFI (Basic Flight Instructor), as well as an equivalent level of knowledge and understanding of those wind and weather conditions which may compromise the pilot's safe control of the TrikeBuggy. In particular, be advised that gusty winds or turbulent conditions may interfere with even an expert pilot's ability to safely control the TrikeBuggy, and may cause it to crash. Never take anything for granted in Trike Flying. If you are in doubt about anything, stop and figure it out or contact TrikeBuggy. Also please read our Warning and Caution! |

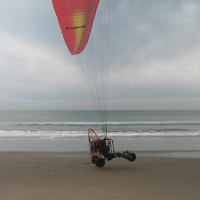
 This is also the only PPG Trike on the market you can transform back into a kitebuggy in just a matter of minutes - giving you the ability to do either activity. When the wind comes up, you'll be ready!


 This will keep the prop wash away from your wing while preparing for inflation. Tighten the lower Gibraltar Clamps firmly on the axle.


